第四章——中断 Interrupt
1. 什么是中断
当单片机正在执行某程序时,如果突然出现意外情况,它就需要停止当前正在执行的程序,转而去处理意外情况,处理完后又接着执行原来的程序。这就是中断的作用。
下面是一个中断示意图:
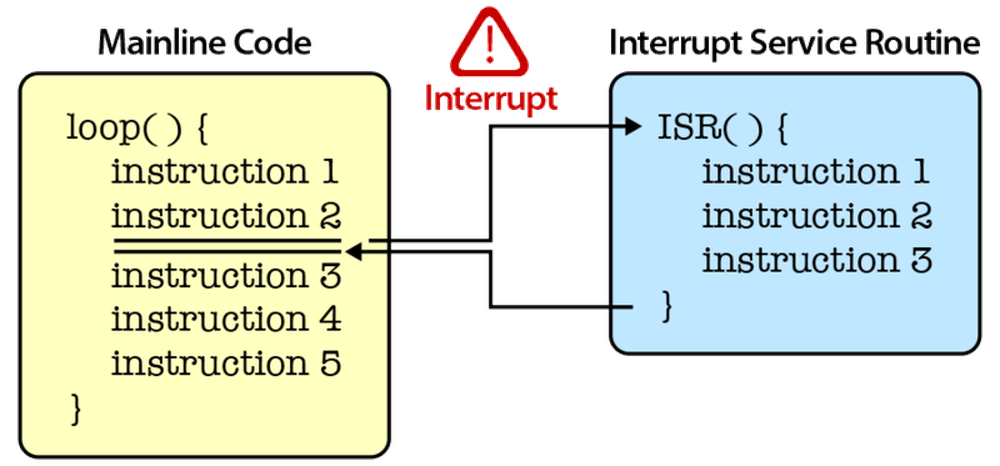
在单片机中有硬件中断和软件中断:
- 硬件中断:当外部事件发生时发生,例如外部中断引脚将其状态从 LOW 变为 HIGH 或 HIGH 变为 LOW。
- 软件中断:根据软件的指令发生。例如定时器中断是软件中断。
下面我们介绍一下 Arduino 的硬件中断。
2. attachInterrupt()函数
在 Arduino 中使用中断非常简单,直接使用attachInterrupt()进行中断配置就可以了。
语法:
attachInterrupt(digitalPinToInterrupt(pin), ISR, mode);
pin 参数:在这里还不能直接使用中断引脚,你必须使用digitalPinToInterrupt(),将对应的引脚映射到对应的中断序号上,在某些单片机芯片上,引脚号就是中断号,但是还是比较建议使用此函数进行映射。
ISR 参数:ISR(Interrupt Service Routine)是中断发生时需要调用的函数名,该函数必须无返回值,无参数。
mode 参数:mode 是指能够触发中断的模式,有以下三种模式可供选择:
下面是 Arduino 部分开发板支持的外部中断引脚分布:
| Aduino Board | Pins |
|---|---|
| Uno,Nano,other 328-based board | 2,3 |
| Mega, Mega2560, MegaADK | 2,3,18,19,20,21 |
- LOW,引脚为低电平触发中断
- CHANGE,引脚电平改变时触发中断
- FALLING,引脚电平出现上升沿时触发中断
- RISING,引脚中断出现下降沿时触发中断
下面是一个在按钮中使用中断的例子,可以帮助大家理解中断的使用:
uint8_t led = 13;
uint8_t button = 2;
bool LEDStatus;

// 中断回调的任务函数
void buttonTask() {
  LEDStatus = !LEDStatus;
  if (LEDStatus)digitalWrite(led, HIGH);
  else digitalWrite(led, LOW);
}

void setup() {
  pinMode(led, OUTPUT);
  pinMode(button, INPUT_PULLUP);
  // 中断初始化
  attachInterrupt(digitalPinToInterrupt(button), buttonTask, FALLING);
}

void loop() {
}
你可以通过detachInterrupt(pin)结束单片机对某个中断引脚的监视。
上面的代码中加入结束中断后如下:
uint8_t led = 13;
uint8_t button = 2;
bool LEDStatus;
unsigned long lastTime;

// 中断回调的任务函数
void buttonTask() {
  LEDStatus = !LEDStatus;
  if (LEDStatus)digitalWrite(led, HIGH);
  else digitalWrite(led, LOW);
}

void setup() {
  pinMode(led, OUTPUT);
  pinMode(button, INPUT_PULLUP);
  // 中断初始化
  attachInterrupt(digitalPinToInterrupt(button), buttonTask, FALLING);
}

void loop() {
  // 20s后结束对中断引脚buttons的监视
  if (millis() - lastTime > 20000) {
    detachInterrupt(digitalPinToInterrupt(button));
  }
}